How to load data in RecyclerView from API in Android(Kotlin)
How to load data in RecyclerView from API:
In our previous tutorial, we learned how to show data in a RecyclerView. In this tutorial, we will learn how to fetch data from an API and load it into the RecyclerView.
This post will focus on loading the data from the API.
YouTube video:
Data to load:
The app will load the following data:
[{"id" : 1,"title" : "Autumn leaves","description": "Lorem ipsum dolor sit amet, consectetur adipiscing elit, sed do eiusmod tempor incididun","image" : "https://cdn.pixabay.com/photo/2020/10/03/17/40/autumn-5624139_1280.jpg"},{"id" : 2,"title" : "Alpine mountains","description": "Lorem ipsum dolor sit amet, consectetur adipiscing elit, sed do eiusmod tempor incididun","image" : "https://cdn.pixabay.com/photo/2020/10/03/10/56/mountains-5623208_1280.jpg"},{"id" : 3,"title" : "Mountain climbing adventure","description": "Lorem ipsum dolor sit amet, consectetur adipiscing elit, sed do eiusmod tempor incididun","image" : "https://cdn.pixabay.com/photo/2016/11/08/05/20/adventure-1807524_1280.jpg"},{"id" : 4,"title" : "Northen light Aurora","description": "Lorem ipsum dolor sit amet, consectetur adipiscing elit, sed do eiusmod tempor incididun","image" : "https://cdn.pixabay.com/photo/2016/02/07/19/48/aurora-1185464_1280.jpg"},{"id" : 5,"title" : "Polar Bear","description": "Lorem ipsum dolor sit amet, consectetur adipiscing elit, sed do eiusmod tempor incididun","image" : "https://cdn.pixabay.com/photo/2013/10/16/14/04/polar-bear-196318_1280.jpg"}]
I created a simple Node.js application that will return this JSON array.
Node.js Application:
Download the Node.js application from this link. You can run npm install && npm run start or yarn && yarn start to run this app. It will start the server on the 3000 port.
Open a browser and go to localhost:3000, it will show you the above JSON array.
Android Studio project:
Let's create one basic Android Studio project and change it as described below:
Dependencies:
Add the following dependencies to the project:
dependencies {implementation fileTree(dir: "libs", include: ["*.jar"])implementation 'org.jetbrains.kotlin:kotlin-stdlib:$kotlin_version'implementation 'androidx.core:core-ktx:1.1.0'implementation 'androidx.appcompat:appcompat:1.1.0'implementation 'androidx.constraintlayout:constraintlayout:1.1.3'testImplementation 'junit:junit:4.12'androidTestImplementation 'androidx.test.ext:junit:1.1.1'implementation 'androidx.recyclerview:recyclerview:1.1.0'implementation 'androidx.cardview:cardview:1.0.0'androidTestImplementation 'androidx.test.espresso:espresso-core:3.2.0'implementation 'com.squareup.retrofit2:retrofit:2.9.0'implementation 'com.squareup.moshi:moshi-kotlin:1.11.0'implementation 'com.squareup.retrofit2:converter-moshi:2.9.0'implementation 'com.github.bumptech.glide:glide:4.11.0'}
A few of these dependencies will be added by default to the project Android Studio will create. We have added the following dependencies:
- RecyclerView: To show the content in a list.
- CardView
- Retrofit: To get the data from the API
- Moshi: JSON converter to convert the JSON data.
- Glide: To load the image into the list item.
Sync the project after you add the dependencies.
AndroidManifest.xml:
Following is the content of the AndroidManifest file used by the project:
<?xml version="1.0" encoding="utf-8"?><manifest xmlns:android="http://schemas.android.com/apk/res/android"package="com.example.myapplication"><uses-permission android:name="android.permission.INTERNET"/><applicationandroid:allowBackup="true"android:icon="@mipmap/ic_launcher"android:label="@string/app_name"android:roundIcon="@mipmap/ic_launcher_round"android:usesCleartextTraffic="true"android:supportsRtl="true"android:theme="@style/AppTheme"><activity android:name=".MainActivity"><intent-filter><action android:name="android.intent.action.MAIN" /><category android:name="android.intent.category.LAUNCHER" /></intent-filter></activity></application></manifest>
- We need to add permission for Internet.
- We need to use usesCleartextTraffic as true as we have to use cleartext network traffic.
Model class:
Create one class Property.kt with the following:
package com.example.myapplication.modelsdata class Property(val id: Int, val title: String, val description: String, val image: String)
This is a data class to hold the JSON data objects.
activity_main.xml:
This is the layout file of the activity:
<?xml version="1.0" encoding="utf-8"?><androidx.constraintlayout.widget.ConstraintLayout xmlns:android="http://schemas.android.com/apk/res/android"xmlns:app="http://schemas.android.com/apk/res-auto"xmlns:tools="http://schemas.android.com/tools"android:layout_width="match_parent"android:layout_height="match_parent"tools:context=".MainActivity"><androidx.recyclerview.widget.RecyclerViewandroid:id="@+id/recycler_view"android:layout_width="match_parent"android:layout_height="match_parent"android:layout_marginStart="1dp"android:layout_marginLeft="1dp"android:layout_marginTop="25dp"android:layout_marginEnd="1dp"android:layout_marginRight="1dp"android:layout_marginBottom="1dp"app:layout_constraintBottom_toBottomOf="parent"app:layout_constraintEnd_toEndOf="parent"app:layout_constraintStart_toStartOf="parent"app:layout_constraintTop_toTopOf="parent" /></androidx.constraintlayout.widget.ConstraintLayout>
It has one RecyclerView.
list_item.xml:
This is the layout file for each RecyclerView list item:
<?xml version="1.0" encoding="utf-8"?><androidx.cardview.widget.CardView android:layout_height="wrap_content"android:layout_width="match_parent"xmlns:android="http://schemas.android.com/apk/res/android"xmlns:app="http://schemas.android.com/apk/res-auto"app:cardCornerRadius="8dp"app:cardElevation="8dp"android:layout_margin="5dp"><androidx.constraintlayout.widget.ConstraintLayoutandroid:layout_width="match_parent"android:layout_height="wrap_content"><ImageViewandroid:id="@+id/imageView"android:layout_width="0dp"android:layout_height="0dp"app:layout_constraintWidth_percent=".3"app:layout_constraintDimensionRatio="1:1"app:layout_constraintBottom_toBottomOf="parent"app:layout_constraintTop_toTopOf="parent"app:layout_constraintLeft_toLeftOf="parent"android:src="@drawable/ic_launcher_background"/><TextViewandroid:id="@+id/tvTitle"android:layout_width="0dp"android:layout_height="wrap_content"app:layout_constraintStart_toEndOf="@+id/imageView"app:layout_constraintEnd_toEndOf="parent"app:layout_constraintTop_toTopOf="parent"android:textSize="25sp"android:fontFamily="sans-serif"android:textColor="#212121"android:layout_marginStart="10dp"android:text="This is a very long title and here it is"android:layout_marginLeft="10dp" /><TextViewandroid:id="@+id/tvDescription"android:layout_width="0dp"android:layout_height="wrap_content"app:layout_constraintStart_toStartOf="@+id/tvTitle"app:layout_constraintEnd_toEndOf="@id/tvTitle"app:layout_constraintTop_toBottomOf="@+id/tvTitle"app:layout_constraintBottom_toBottomOf="parent"android:textSize="18sp"android:fontFamily="sans-serif"android:text="This is a very long title and here it is"/></androidx.constraintlayout.widget.ConstraintLayout></androidx.cardview.widget.CardView>
RecyclerView adapter:
Create one file MyAdapter.kt to use as the RecyclerView adapter:
package com.example.myapplicationimport android.view.LayoutInflaterimport android.view.Viewimport android.view.ViewGroupimport android.widget.ImageViewimport android.widget.TextViewimport androidx.recyclerview.widget.RecyclerViewimport com.bumptech.glide.Glideimport com.example.myapplication.models.Propertyimport org.w3c.dom.Textclass MyAdapter(private val data: List<Property>) : RecyclerView.Adapter<MyAdapter.MyViewHolder>() {class MyViewHolder(val view: View): RecyclerView.ViewHolder(view){fun bind(property: Property){val title = view.findViewById<TextView>(R.id.tvTitle)val imageView = view.findViewById<ImageView>(R.id.imageView)val description = view.findViewById<TextView>(R.id.tvDescription)title.text = property.titledescription.text = property.descriptionGlide.with(view.context).load(property.image).centerCrop().into(imageView)}}override fun onCreateViewHolder(parent: ViewGroup, viewType: Int): MyViewHolder {val v = LayoutInflater.from(parent.context).inflate(R.layout.list_item, parent, false)return MyViewHolder(v)}override fun getItemCount(): Int {return data.size}override fun onBindViewHolder(holder: MyViewHolder, position: Int) {holder.bind(data[position])}}
- It takes the data as the data source to load to the RecyclerView.
- It uses the list_item layout to show the data to a RecyclerView item.
- To load the image in the ImageView, it uses Glide.
ApiService:
Create one file ApiService.kt to write the retrofit API calls:
package com.example.myapplication.networkimport com.example.myapplication.models.Propertyimport com.squareup.moshi.Moshiimport com.squareup.moshi.kotlin.reflect.KotlinJsonAdapterFactoryimport retrofit2.Callimport retrofit2.Retrofitimport retrofit2.converter.moshi.MoshiConverterFactoryimport retrofit2.http.GETprivate const val BASE_URL = "http://10.0.2.2:3000"private val moshi = Moshi.Builder().add(KotlinJsonAdapterFactory()).build()private val retrofit = Retrofit.Builder().addConverterFactory(MoshiConverterFactory.create(moshi)).baseUrl(BASE_URL).build()interface ApiService{@GET(".")fun getAllData(): Call<List<Property>>}object Api {val retrofitService: ApiService by lazy{retrofit.create(ApiService::class.java)}}
- We are using the base url as 10.0.2.2 as this is the localhost url for emulators.
- The retrofit builder uses moshi as the converter.
- The getAllData method is used to get the data from the BASE_URL. It converts the data to a list of Property object.
MainActivity:
The code of MainActivity is:
package com.example.myapplicationimport androidx.appcompat.app.AppCompatActivityimport android.os.Bundleimport androidx.recyclerview.widget.LinearLayoutManagerimport androidx.recyclerview.widget.RecyclerViewimport com.example.myapplication.models.Propertyimport com.example.myapplication.network.Apiimport retrofit2.Callimport retrofit2.Callbackimport retrofit2.Responseclass MainActivity : AppCompatActivity() {private lateinit var recyclerView: RecyclerViewprivate lateinit var manager: RecyclerView.LayoutManagerprivate lateinit var myAdapter: RecyclerView.Adapter<*>override fun onCreate(savedInstanceState: Bundle?) {super.onCreate(savedInstanceState)setContentView(R.layout.activity_main)manager = LinearLayoutManager(this)getAllData()}fun getAllData(){Api.retrofitService.getAllData().enqueue(object: Callback<List<Property>>{override fun onResponse(call: Call<List<Property>>,response: Response<List<Property>>) {if(response.isSuccessful){recyclerView = findViewById<RecyclerView>(R.id.recycler_view).apply{myAdapter = MyAdapter(response.body()!!)layoutManager = manageradapter = myAdapter}}}override fun onFailure(call: Call<List<Property>>, t: Throwable) {t.printStackTrace()}})}}
- It calls the getAllData function to load the data by using the API service.
- Once the data is received, it creates one adapter and assigns that adapter to the RecyclerView.
- The RecyclerView uses a LinearLayoutManager as we are showing the data in a vertical list.
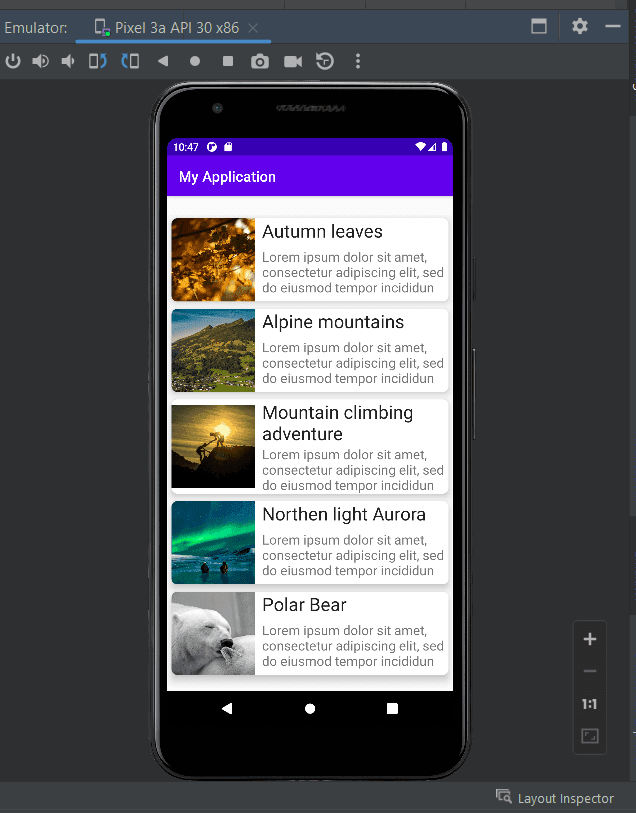
Output:
It will give the below output:
Github:
The code is available on Github. Please use the tut-2 tag to get the code explained on this tutorial.
git clone https://github.com/AppDevAssist/recyclerview-kotlin && git checkout tags/tut-2

