Introduction to RecyclerView in Android Kotlin
Introduction to RecyclerView in Android:
RecyclerView is one of the important view components in Android. It is used to show a list in Android. Another component called ListView can be used to show a list, but RecyclerView is more preferred. You can say that this is a better version of ListView.
In this post, we will learn how to use RecyclerView to create a list in Android. We will use Kotlin for this exercise.
YouTube video:
I have published one video on YouTube explaining it with one example. You can watch it here:
Components used to create a RecyclerView:
There are three main components that you need to create a RecyclerView. These are:
Layout Manager: This is the manager class for RecyclerView. We can create our own manager or we can use LinearLayoutManager or GridLayoutManager which are inbuilt classes. LinearLayoutManager is used to create one list and GridLayoutManager is used to create one grid list.
View Holder: This is a class created by extending RecyclerView.ViewHolder. This class is responsible for showing each view or cell in the recyclerview.
Adapter: This is another class we need to create by extending RecyclerView.Adapter. It works as manager class for the view holders. It creates view holders and binds data to the view holders.
Android Studio project:
Create one basic Android Studio project. Make sure to select Kotlin as the language. The app I am using here has one activity MainActivity.kt and its xml file activity_main.xml.
Gradle dependency:
We need to add RecyclerView as dependency in our build.gradle file.
You will find the latest release version here
Go to your module level build.gradle and add this line in your dependencies tab:
implementation "androidx.recyclerview:recyclerview:1.2.0"
Make sure to get the latest one from the above link.
Once this change is done, Android Studio will show one message to sync the project. Click on Sync Now to sync it.
activity_main.xml file:
This file is for the layout of the main activity MainActivity.kt. We have one RecyclerView added to this layout:
<?xml version="1.0" encoding="utf-8"?><FrameLayout xmlns:android="http://schemas.android.com/apk/res/android"android:id="@+id/frameLayout"android:layout_width="match_parent"android:layout_height="match_parent"><androidx.recyclerview.widget.RecyclerViewandroid:id="@+id/recyclerViewList"android:layout_width="match_parent"android:layout_height="match_parent" /></FrameLayout>
recyclerview_item.xml:
Create one new file recyclerview_item to use as the recyclerview item layout.
<?xml version="1.0" encoding="utf-8"?><LinearLayout xmlns:android="http://schemas.android.com/apk/res/android"android:layout_width="match_parent"android:layout_height="wrap_content"><TextViewandroid:id="@+id/itemTextView"android:layout_width="match_parent"android:layout_height="wrap_content"android:textSize="20sp"/></LinearLayout>
MainActivity.kt:
Below is the complete MainActivity.kt file:
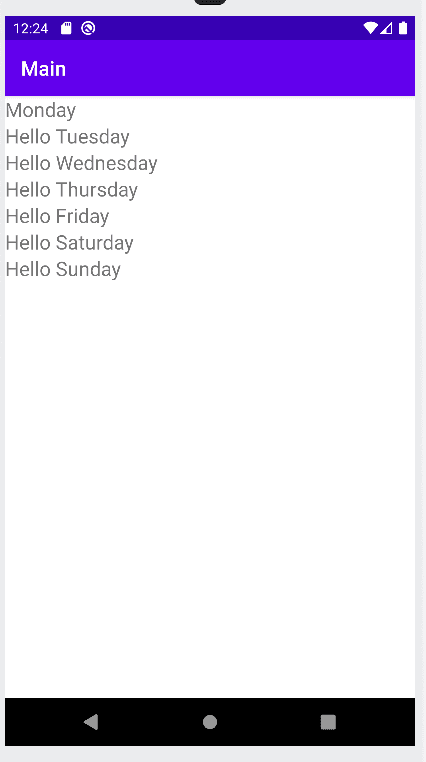
import androidx.appcompat.app.AppCompatActivityimport android.os.Bundleimport android.view.LayoutInflaterimport android.view.Viewimport android.view.ViewGroupimport android.widget.TextViewimport androidx.recyclerview.widget.LinearLayoutManagerimport androidx.recyclerview.widget.RecyclerViewclass MainActivity : AppCompatActivity() {val listData = arrayOf("Monday","Hello Tuesday","Hello Wednesday","Hello Thursday","Hello Friday","Hello Saturday","Hello Sunday")private lateinit var recyclerView: RecyclerViewprivate lateinit var recyclerViewAdapter: RecyclerView.Adapter<*>private lateinit var recyclerViewManager: RecyclerView.LayoutManageroverride fun onCreate(savedInstanceState: Bundle?) {super.onCreate(savedInstanceState)setContentView(R.layout.activity_main)recyclerViewManager = LinearLayoutManager(this)recyclerViewAdapter = RecyclerViewAdapter(listData)recyclerView = findViewById<RecyclerView>(R.id.recyclerViewList).apply {layoutManager = recyclerViewManageradapter = recyclerViewAdapter}}}class RecyclerViewAdapter(private val listData: Array<String>) :RecyclerView.Adapter<RecyclerViewAdapter.RecyclerViewHolder>() {class RecyclerViewHolder(val v: View) : RecyclerView.ViewHolder(v) {fun bindData(value: String) {val textView = v.findViewById<TextView>(R.id.itemTextView)textView.text = value}}override fun onCreateViewHolder(parent: ViewGroup, viewType: Int): RecyclerViewHolder {val view =LayoutInflater.from(parent.context).inflate(R.layout.recyclerview_item, parent, false)return RecyclerViewHolder(view)}override fun onBindViewHolder(holder: RecyclerViewHolder, position: Int) {holder.bindData(listData[position])}override fun getItemCount(): Int {return listData.size}}
We have,
- listData is a list of strings to load in the RecyclerView.
- recyclerViewManager is the layout manager for the recyclerview. We are using one LinearLayoutManager.
- RecyclerViewAdapter is the adapter class for the recyclerview and RecyclerViewHolder is the view holder.
- We are passing the data to the adapter.
- It gets the item count using getItemCount.
- Then it calls onCreateViewHolder to create one view holder. We are loading the item layout and creating the view holder in this method.
- Next it calls onBindViewHolder to bind data with the list item. It calls bindData method of the view holder and the view holder loads the text in the TextView of the recyclerview_item layout.
Output:
If you run this program, it will load the strings in a list, i.e. in a RecyclerView:

